![]()
INTRODUCTION
![]()
IAN MARCHANT'S HELMET
![]()
HELMET
![]()
SHOULDER ARMOUR
![]()
GLOVES
![]()
ARM ARMOUR
![]()
BELT AND CODPIECE
![]()
KNEE PADS
![]()
BOOTS
![]()
LAWGIVER AND HOLSTER
![]()
PAINTING
![]()
FINISHED
![]()
CONVENTION PHOTOS
HOW TO BUILD A JUDGE DREDD COSTUME
BY KEVIN GOLDSMITH
THE LAWGIVER
Apart from the sheet plastic, the Lawgiver was the only other expensive item that I bought for the costume, costing �34. Its full name is 'Logic 3-Predator 2, model ps 4003'. A member, who also told me how to modify it, suggested it to me. The photos will give you the basic idea of how to do the innards, but here is what you do in more detail:
1) Take gun apart. It comes apart in two halves after the removal of 6 self-threading screws.
2) Remove any protruding cable, and any electronic equipment from gun handle. Cut out any moulding that held these devices in place.
3) Remove circuitry from upper and lower gun barrel. Do not touch LED circuit board.
4) Remove this circuit board. Two screws hold it in place, which has a push-button operated by the trigger. It is easier to unhinge the trigger first.
5) Carefully break off this part of the circuit board and consign with the other removed parts to your 'bits'/'I'll find a use for it one day' box - but make sure that you keep (4) part of the board.
6) Strip those wires so that about an inch is bared. If you have the gun as in the diagram and photos, the left most wire is the negative and the rest are the positive. Bunch the positives together and solder to a single length of wire.
The rest involves wiring everything up - the LED's through the switch to a 9 volt battery, which I managed through trial and error.
I know that all this looks and sounds complicated, but once I had removed all the unwanted stuff, I found the rest remarkably easy. Lastly, the remaining components on circuit board (4) should not have any effect on the new circuit.
I then carefully cut away the handle section of the right half of the gun, to give me access to the battery when necessary, and then screwed everything back together.
To make the gun look more like the movie version, I added two pieces to the upper barrel. I scraped away the paint and then Superglued them on, after which I scored on the eagle motif using the picture in the 'Making Of' book. For the lower extension, I scraped away paint from areas of the left gun half, and then made the oblong box from, again, styrene sheet, using Superglue where the styrene touched the gun and standard liquid glue where styrene touched styrene. I then filled and sanded where necessary.
Gun holster. As far as I can make out, you do not actually see the gun being unholstered and holstered in the movie, but a photo in the 'Making Of' book shows the lawgiver holstered. The weapon is held in place by clear plastic that only covers the lower barrel, and uses the same principal as the cover that clicks onto the top of a shaver.
I thought of using the same method, but thought that it would be a bit awkward to remove and put back - like a lot of things, what works in films and T.V. does not work in the real world. I noticed a 'trench' that runs between the upper and lower barrel, and thought why not have the gun slot into place, a piece at the bottom of the assembly would stop the gun from dropping out.
I cut 2 pieces this shape: ![]() and then cut two 5mm
wide strips that I Superglued to the inside front edges. I then
test fitted the pieces on either side of the gun. The fit was
perfect! I then made the rear wall with a piece 32mm by 6 inches
and a bottom piece 32mm by 28mm.
and then cut two 5mm
wide strips that I Superglued to the inside front edges. I then
test fitted the pieces on either side of the gun. The fit was
perfect! I then made the rear wall with a piece 32mm by 6 inches
and a bottom piece 32mm by 28mm.
On the piece of the holster that would be physically attached to the holster strap, I cut two 5mm by 40mm slots, one 3/4 inch from the top, the other the same from the bottom, and Superglued pieces of styrene behind these. Into these I drilled 2 holes, so that later on I could sew the holster to its strap. I Superglued the assembly together and, once dry, I test fitted it - the gun slid in and out of its holster just nicely. The assembly was then sewed to the strap.
Then a problem occurred. I tried the holster and belt assembly on. Because of the position of the gun on the holster strap and the weight of the gun, this caused the gun to tilt outwards and look ridiculous. I solved the problem by making an extra strap to go just above the holster.
Finished at last - well the building anyway.
As with Ian, this has to be the most complicated thing that I have ever built, and each section took about a week to build (except the upper armour, which took the best part of a month), and I started way back in early June, and it is now mid-November! I am pleased with the results.
Happy Modelling
Kevin 'Info' Goldsmith
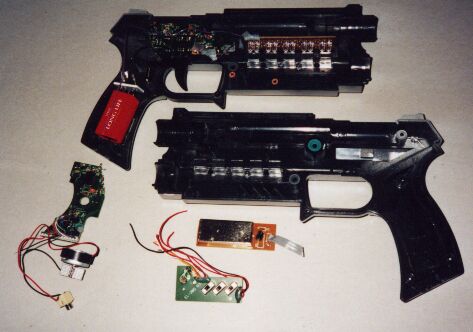
(1) Inside of gun after modifications. Parts in bottom left-hand corner were disgarded and filed in 'bits' box.
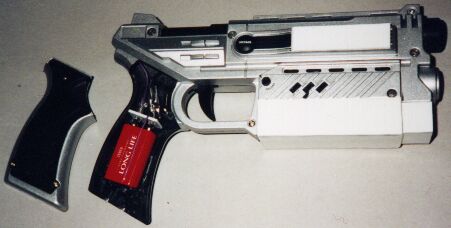
(2) Gun screwed together. White areas are styrene add-ons to make the weapon look chunkier - as in the film. Modification for battery compartment can also be seen.
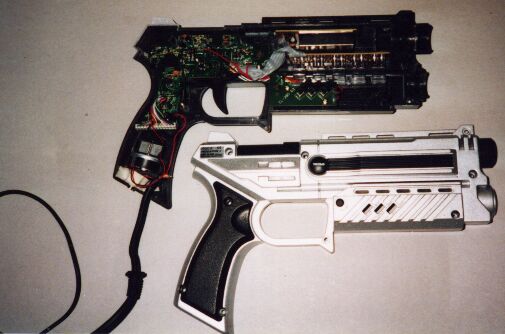
(3) Inside of gun before modifications.
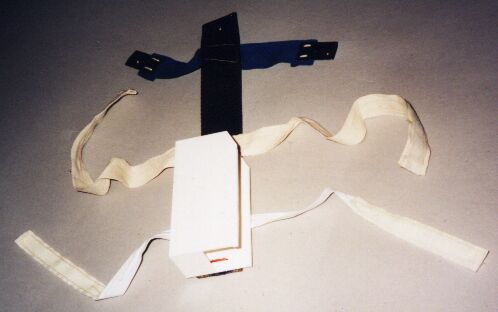
(4) Gun holster with added extra strap.
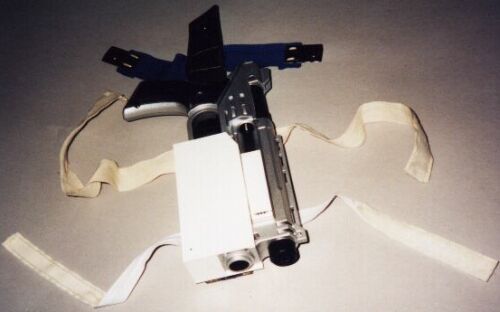
(5) Shows how gun and holster relate to each other.
![]() Judge Dredd and 2000 AD © Rebellion A/S 2008.
Judge Dredd and 2000 AD © Rebellion A/S 2008.
BARNEY is a fan site by
based on 2000 AD Online 2001-2008.